コンテンツのダウンロード
このチュートリアルではコンテンツのダウンロード方法について学びます。 command.cgiを使用して取得したコンテンツリストから、選択されたイメージファイルを表示するアプリケーションを作成します。
このチュートリアルは別項のiOS Tutorial 2:コンテンツリストの取得に基づいています。 それではさっそく作ってみましょう。
画面レイアウトの作成
今回作成するアプリケーションの画面レイアウトです。
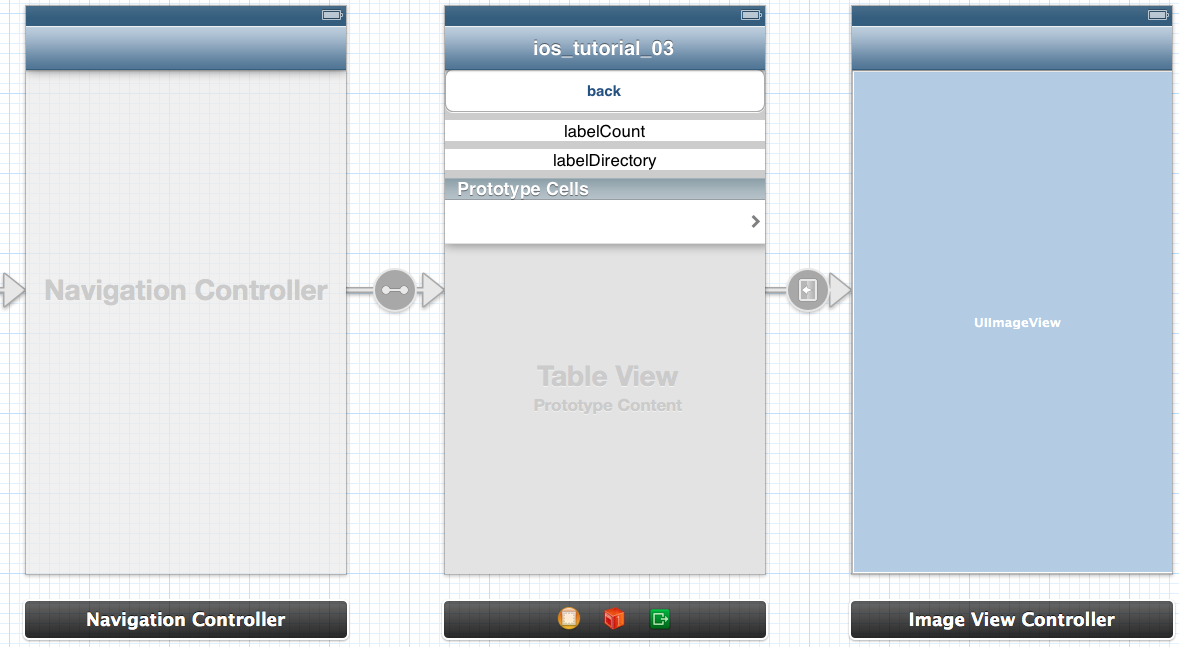
アプリケーションが起動されると、labelCount にファイル数、labelDirectory に現在のフォルダ、Table View にコンテンツリストが表示されるように作ります。 コンテンツリストのコンテンツがタップされると、該当のイメージファイルをダウンロードし、Image View に表示します。 以下の部品を配置します。
コンテンツリスト画面
- Round Rect Button(
UIButton)- back : 一つ上の階層へ移動
- Label(
UILabel)- labelCount : 現在のフォルダのファイル数を表示
- labelDirectory : 現在のフォルダパスを表示
- labelCount : 現在のフォルダのファイル数を表示
- Table View(
UITableView)- コンテンツリスト
- Table View Cell(
UITableViewCell)- コンテンツリスト上のセル
イメージ表示画面
- View Controller(
UIViewController) - Image View(
UIImageView)- イメージファイルを表示
その他
- Navigation Controller(
UINavigationController)- イメージファイル表示画面から、コンテンツリスト画面へ戻るために使用
このように表示されるコンテンツリストを作ります。
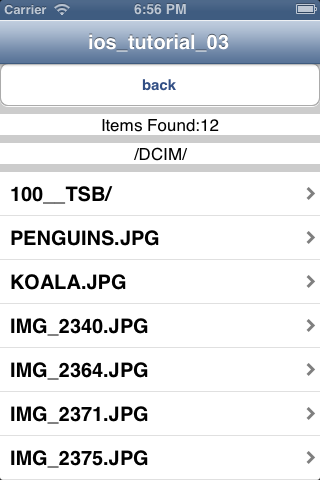
フォルダがタップされた場合は、選択したフォルダの中身を表示します。 back がタップされた場合は、ひとつ上のフォルダの中身を表示します。 イメージファイルがタップされた場合は、以下のように画像を表示します。

コードの作成
イメージファイルの表示
イメージファイルの表示は、イメージファイル表示用の View Controller を用意し、そのサブクラス内で行います。 サブクラスは以下のクラス名で用意します。
- FSImageViewController
- イメージファイルの取得は、CGIは介さずに直接ファイルパスを指定することで実現します。 取得の際には、NSData dataWithContentsOfURLを使用してい ます。 この関数は、データオブジェクトを返します。
FSImageViewController.h
@interface FSImageViewController : UIViewController
@property (strong, nonatomic) IBOutlet UIImageView *imageView;
@property (nonatomic) NSString *fileInfo;
@end
- 3行目
fileInfo:コンテンツリストの View Controller から、選択されたファイル情報を受け取るための property です。
FSImageViewController.m
    - (void)viewDidLoad
    {
        [super viewDidLoad];

        // Do any additional setup after loading the view.
        // Make a file path
        NSString *dir =
            [[self.fileInfo componentsSeparatedByString:@","] objectAtIndex:0];
        NSString *filename =
            [[self.fileInfo componentsSeparatedByString:@","] objectAtIndex:1];
        NSString *filePath =
            [[dir stringByAppendingString:@"/"] stringByAppendingString:filename];
        // Run
        NSURL *url =
            [NSURL URLWithString:[NSString stringWithFormat:@"http://flashair/%@", filePath]];
        // Get image data
        if(nil == url)return;
        NSData *img_data = [NSData dataWithContentsOfURL:url];
        UIImage *img = [[UIImage alloc] initWithData:img_data];
        // Display results
        self.imageView.image = img;

    }
- 7-12行目
コンテンツリストの View Controller から引き渡されたファイル情報をもとに、ファイルパスを作成しています。 - 14-15行目
使用するURLです。 - 17-19行目
URLを実行しイメージデータを取得しています。 - 21行目
取得したイメージデータを、Image View に設定しています。
コンテンツリストの表示
コンテンツリストの取得は、
command.cgi の
op=100、
op=101 を使用します。
取得方法については、別項の
iOS Tutorial 2:コンテンツリストの取得 を参照してください。
今回は取得結果を、Table View に設定しています。
FSViewController.h
    #import <UIKit/UIKit.h>
    #import "FSImageViewController.h"

    @interface FSViewController : UIViewController{
    @private
        NSArray  *files;
        NSString *count;
        NSString *rowdata;
    }
    @property (strong, nonatomic) IBOutlet UILabel *labelCount;
    @property (strong, nonatomic) IBOutlet UILabel *labelDirectory;
    @property (strong, nonatomic) IBOutlet UITableView *tableViewFileList;
    - (IBAction)buttonPush:(id)sender;
    - (void)getFileList:(NSString*)path;
    @end
- 2行目
イメージファイルを表示する側の View Controller の property に、選択されたファイル情報を渡す必要があるので、サブクラスを importしています。 - 6-8行目
files,count:command.cgiのop=100,op=101で取得した結果をそれぞれ管理します。
rowdata:選択中の行のファイル情報を管理します。
FSViewController.m コンテンツリスト取得
    - (void)getFileList:(NSString *)path{

        NSError *error = nil;

        // Get file list
        // Make url
        NSURL *url100 = [NSURL URLWithString:[@"http://flashair/command.cgi?op=100&DIR="
                                                                stringByAppendingString: path]];
        // Run cgi
        NSString *dirStr = [NSString stringWithContentsOfURL:url100
                                                    encoding:NSUTF8StringEncoding error:&error];
        if ([error.domain isEqualToString:NSCocoaErrorDomain]){
            NSLog(@"error100 %@\n",error);
            return;
        }
        files = [dirStr componentsSeparatedByString:@"\n"];

        // Get the number of files
        // Make url
        NSURL *url101 = [NSURL URLWithString:[@"http://flashair/command.cgi?op=101&DIR="
                                                                stringByAppendingString: path]];
        // Run cgi
        NSString *cntStr = [NSString stringWithContentsOfURL:url101
                                                    encoding:NSUTF8StringEncoding error:&error];
        if ([error.domain isEqualToString:NSCocoaErrorDomain]) {
            NSLog(@"error101 %@\n",error);
            return;
        }
        count = cntStr;

        // Display results
        self.labelCount.text = [@"Items Found:" stringByAppendingString:cntStr];
        if(![path isEqualToString:@"/"]){
            self.labelDirectory.text = [path stringByAppendingString:@"/" ];
        }else{
            self.labelDirectory.text = @"/";
        }

    }
- 7-16行目
command.cgiのop=100を実行し、結果をインスタンス変数に設定しています。 - 20-29行目
command.cgiのop=101を実行し、結果をインスタンス変数に設定しています。 - 32-37行目
各結果をlabelDirectoryに設定しています。
FSViewController.m tableView(1) セルの列数、行数を設定
    - (NSInteger)numberOfSectionsInTableView:(UITableView *)tableView
    {
        // Return the number of sections.
        return 1;
    }

    - (NSInteger)tableView:(UITableView *)tableView numberOfRowsInSection:(NSInteger)section
    {
        // Return the number of rows in the section.
        return [count intValue];
    }
- 4,10行目
Table View のセルの個数を設定しています。
FSViewController.m tableView(2) セルのテキストを設定
    - (UITableViewCell *)tableView:(UITableView *)tableView cellForRowAtIndexPath:(NSIndexPath *)indexPath
    {
        static NSString *CellIdentifier = @"Cell";
        UITableViewCell *cell = [tableView dequeueReusableCellWithIdentifier:CellIdentifier
                                                                        forIndexPath:indexPath];

        // Configure the cell...
        if (cell == nil) {
            cell = [[UITableViewCell alloc] initWithStyle:UITableViewCellStyleDefault
                                                                reuseIdentifier:CellIdentifier];
        }

        NSString *filename = [[[files objectAtIndex:indexPath.row + 1]
                                            componentsSeparatedByString:@","] objectAtIndex:1];
        unsigned char attribute = [[[[files objectAtIndex:indexPath.row + 1]
                                    componentsSeparatedByString:@","] objectAtIndex:3] intValue];

        // If it is folder
        if ((attribute & 0x10) != 0) {
            filename = [filename stringByAppendingString:@"/" ];
        }else{
            NSArray *name_array = [filename componentsSeparatedByString:@"."];
            NSString *ext = [[name_array objectAtIndex:[name_array count]-1] lowercaseString];
            if (!([ext isEqualToString:@"jpg"] || [ext isEqualToString:@"jpeg"] ||
                  [ext isEqualToString:@"png"] || [ext isEqualToString:@"jpe"])) {
                [cell setUserInteractionEnabled:NO];
            }
        }
        cell.textLabel.text = filename;

        return cell;
    }
-
3-11行目
処理対象のセルを取得しています。 -
13-28行目
ファイル名、ファイルの属性を取得しています。 フォルダ、ファイル毎に表示用の調整を行っています。 -
29行目
取得したファイル名を、textLabelに設定しています。
コンテンツリストの動作
作成したコンテンツリストがタップされた際の動作です。 イメージファイルが選択された際の処理と、フォルダまたは back がタップされた際の処理を実装します。
コンテンツリストがタップされた際の動作です。
FSViewController.m tableView 動作
    - (void)tableView:(UITableView *)tableView didSelectRowAtIndexPath:(NSIndexPath *)indexPath
    {
        // Navigation logic may go here. Create and push another view controller.
        rowdata = [files objectAtIndex:indexPath.row + 1];
        NSString *dir = [[rowdata componentsSeparatedByString:@","] objectAtIndex:0];
        NSString *filename = [[rowdata componentsSeparatedByString:@","] objectAtIndex:1];
        NSString *filePath = [[dir stringByAppendingString:@"/"] stringByAppendingString:filename];

        // If it is folder
        if(([[[rowdata componentsSeparatedByString:@","] objectAtIndex:3] intValue] & 0x10) != 0){
            [self getFileList:filePath];
            [self.tableViewFileList reloadData];
        }else{
            [self performSegueWithIdentifier:@"imageView" sender:self];
        }

        [super viewDidLoad];
        // Do any additional setup after loading the view, typically from a nib.

    }

    - (void) prepareForSegue:(UIStoryboardSegue *)segue sender:(id)sender {
        // Give next View the Data
        if ([segue.identifier isEqualToString:@"imageView"]) {
            FSImageViewController *iamgeViewController = segue.destinationViewController;
            iamgeViewController.fileInfo = rowdata;
        }
    }
- 4-15行目
フォルダが選択された場合は、再度command.cgiを使用してフォルダの中身を取得したのち、 Table View に設定しています。
ファイルが選択された場合は、イメージファイル表示用の View Controller を呼び出しています。 - 24-26行目
イメージファイル表示用の View Controller に、選択されたコンテンツの情報を引き渡しています。
back がタップされた際の動作です。
FSViewController.m buttonPush動作
    - (IBAction)buttonPush:(id)sender {
        NSString *path = [self.labelDirectory.text
                                    substringToIndex:[self.labelDirectory.text length] - 1];
        NSRange found = [path rangeOfString:@"/" options:NSBackwardsSearch];

        if(found.location != NSNotFound){
            if (found.location == 0) {
                path = @"/";
            }else{
                path = [path substringToIndex:found.location];
            }
        }else{
            path = @"/";
        }

        // Reload tableview
        [self getFileList:path];
        [self.tableViewFileList reloadData];
    }
- 1-14行目
戻り先のパスを作成しています。 - 17-18行目
作成したパスをもとに、再度command.cgiを使用してコンテンツを取得し、 Table View に設定しています。
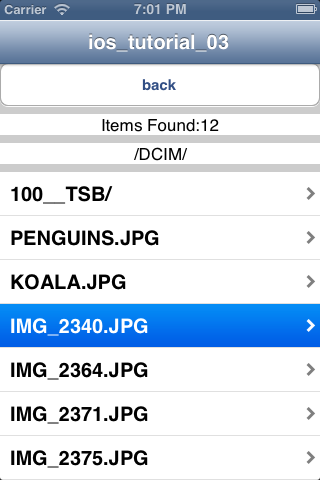
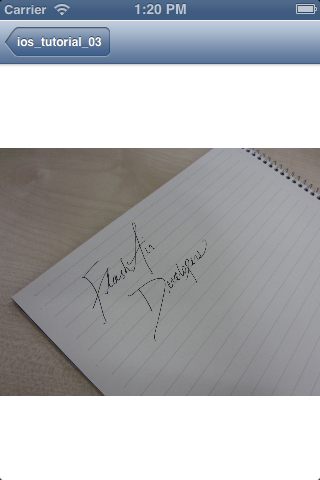
実行結果
プログラムが出来上がったら、確認をしてみましょう。 Table View 上の、IMG_2340.JPG をタップしたのち、該当のイメージファイルが表示されました。
以上で、コンテンツのダウンロード に関する解説はおわりです。
サンプルコード
ios_tutorial_03.zip (25KB)
このサイトのサンプルコードは二条項BSDライセンスで提供されています。